
You can film the perfect TikTok, but if your editing is off, nobody's watching past the first three seconds.
That's reality. TikTok moves fast, attention spans are shorter than ever, and your editing choices can be the difference between 200 views and 200,000. In 2026, TikTok's editor has more power than most creators realize (multi-track editing, overlays, AI effects), but knowing which buttons to press isn't the same as knowing how to keep people watching.
This guide walks through everything you need to edit TikTok videos that actually perform. We'll cover TikTok's built-in tools, when to use external apps like CapCut, and the specific editing techniques that hook viewers and keep them through to the end.
TikTok Video Format Requirements (2026 Specs)
Before you start cutting clips, your video needs to match TikTok's format. Get these wrong and you're fighting uphill from the start.
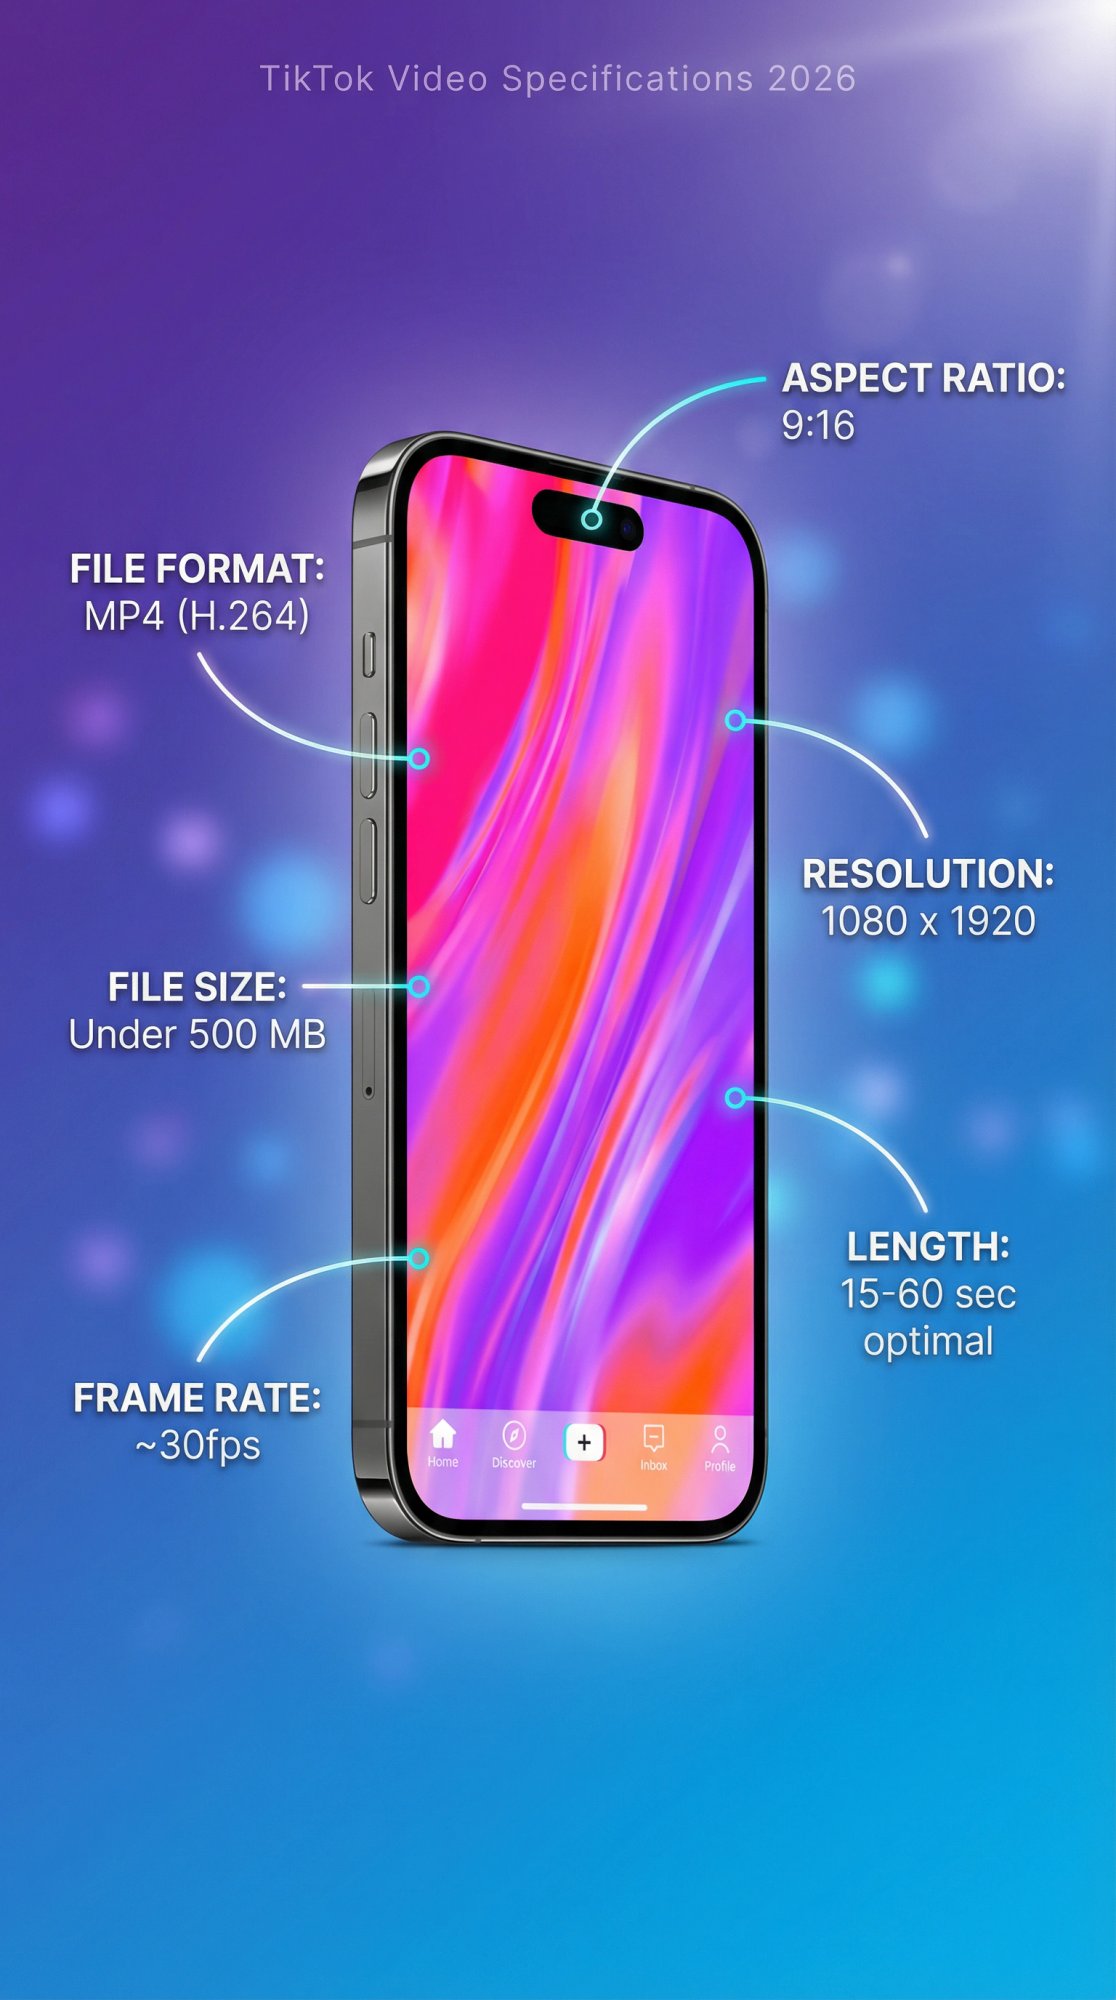
| Specification | Requirement | Why It Matters |
|---|---|---|
| Aspect Ratio | 9:16 (vertical) or 1:1 (square) | Fills the screen, no black bars |
| Resolution | 1080 x 1920 pixels (1080p HD) | Sharp, professional appearance |
| Length | 15-60 seconds optimal (up to 10 min allowed) | Shorter usually wins engagement |
| File Format | MP4 (H.264 codec) or MOV | Best quality-to-size balance |
| File Size | Under 500 MB | TikTok's maximum limit |
| Frame Rate | ~30fps standard | Smooth playback |
Vertical is mandatory. TikTok is built for phones held upright. Horizontal videos will have black bars and tend to perform poorly because they don't fill the screen. Always shoot and edit vertically.
Resolution matters. Aim for 1080 x 1920 pixels (1080p HD). TikTok itself recommends 1080p for best results, with a minimum of 720p. High-definition videos look sharper and more professional, which can improve engagement. Most modern phones shoot 1080p by default, so use that quality in your exports.
Length is strategic. TikTok allows videos up to 10 minutes long as of 2025, but shorter usually wins. The first 3 seconds are critical to grab attention. Many viral TikToks land in the 15-60 second range. You can go longer for educational or storytelling content (some run 2-3 minutes), but ask yourself if every second is engaging. If not, trim it. Understanding what makes content go viral on TikTok can help you determine the optimal length for your videos.
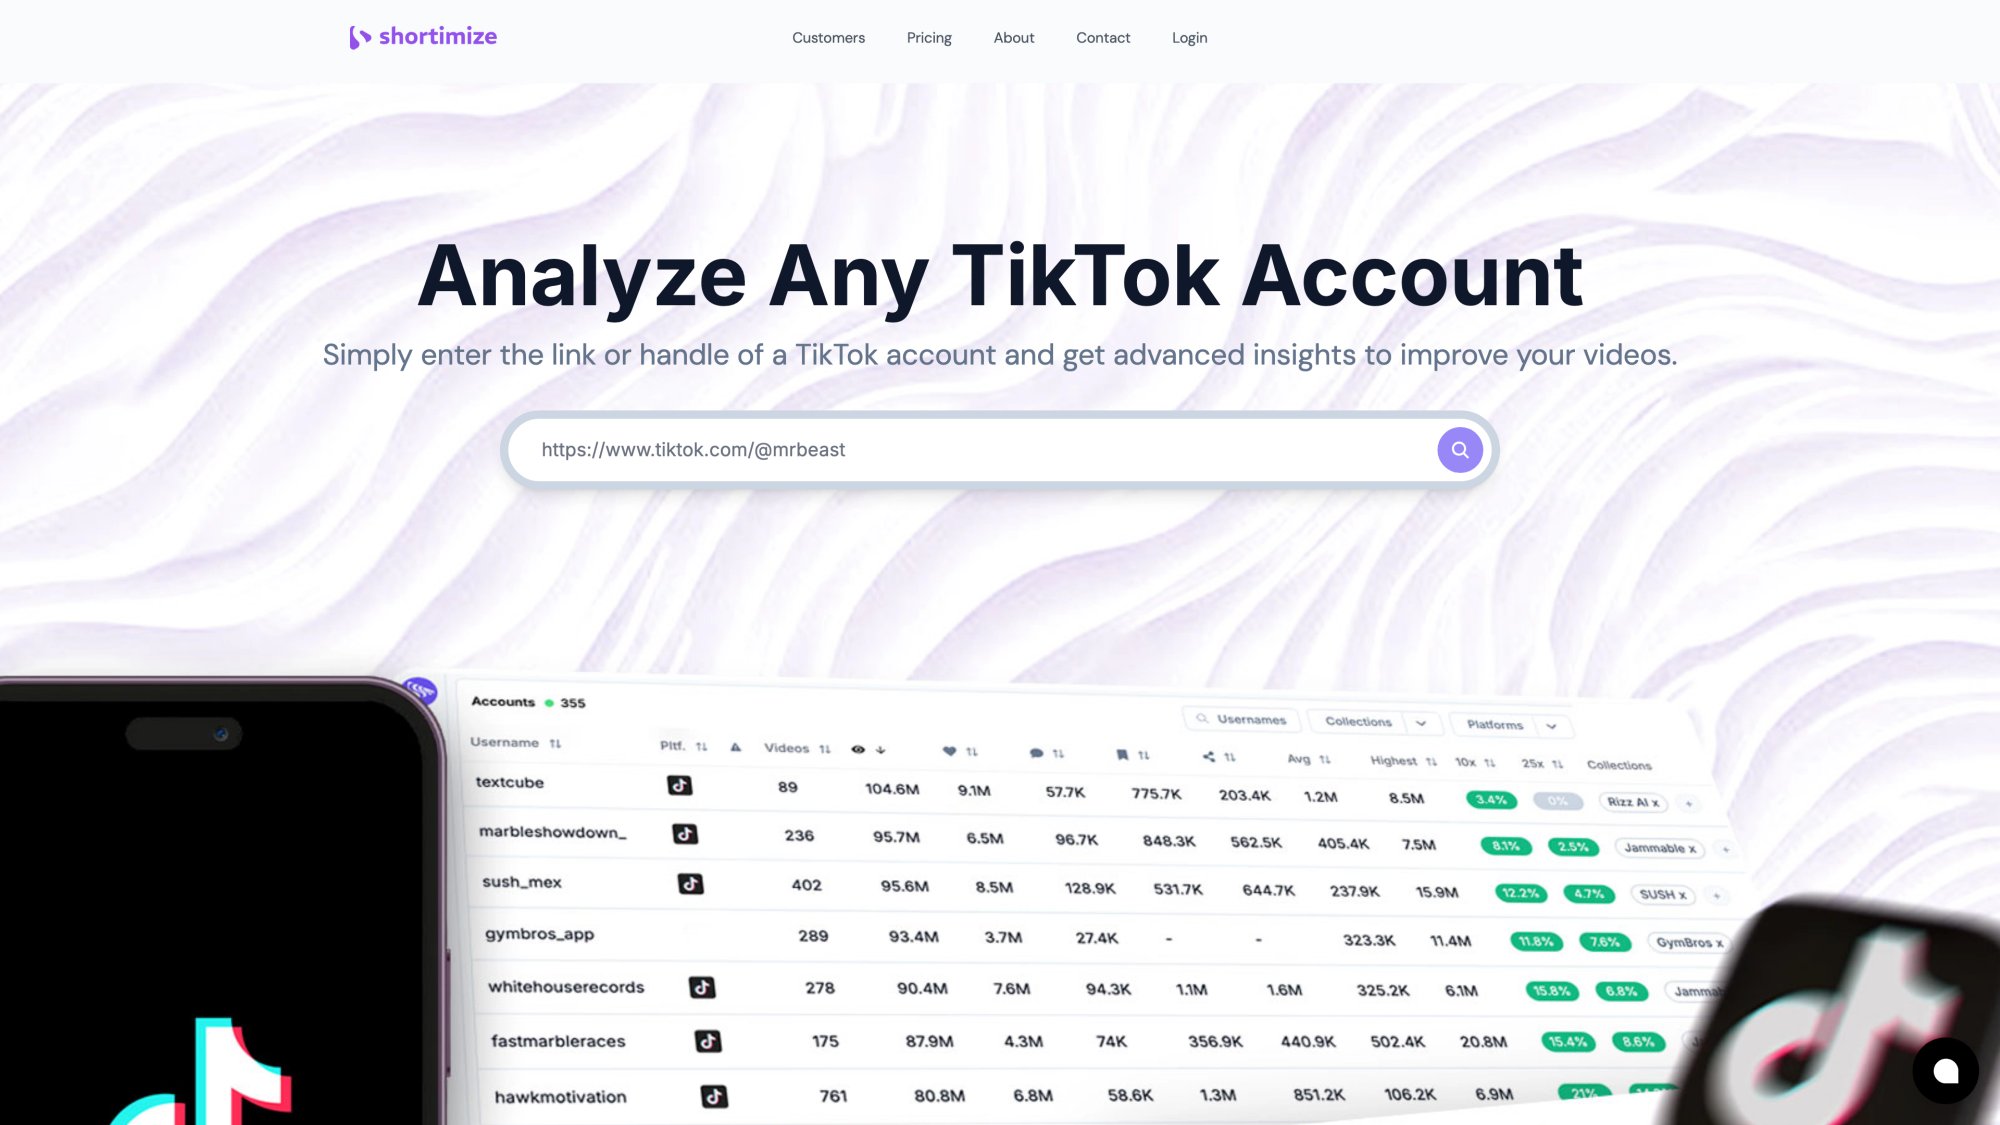
Plan your content briefly before editing. Decide the story or message, figure out the hook (the opening that grabs attention), and gather any assets you'll need like music, sounds, or text captions. Having a clear idea makes editing smoother. If you're managing multiple accounts or tracking content performance across platforms, tools like Shortimize can help you analyze TikTok account performance and understand what's working.
How to Use TikTok's Built-In Editor: Step-by-Step
TikTok's built-in editor has become surprisingly powerful, and it's designed specifically for TikTok formats and features. Here's how to use it effectively:
How to Start Your Edit
Open TikTok and tap the "+" (Add post) button. Record using the TikTok camera, or tap "Upload" to import clips from your device. Once you have footage ready, tap "Next" (if you imported) or the checkmark, then tap the "Edit" button on the side panel. This opens TikTok's advanced editing screen.
How to Trim, Split, and Reorder Video Clips
On the editing screen, you'll see a timeline of your video clips. Tap a clip (or tap "Edit" at the bottom) to make basic edits:
→ Trim the clip by dragging the handles at the start or end to shorten or lengthen it. Cut out dead air or unnecessary footage so the video jumps right into the good part.
→ Split the clip to cut it into two pieces. Position the playhead where you want to split, then tap "Split". This is useful if you want to remove a middle section or insert another clip in between.
→ Reorder clips by pressing and holding a clip and dragging it earlier or later in the timeline. If you filmed out of sequence or have multiple segments, you can arrange them in the best order for your story.
→ Zoom or crop: Use two fingers (pinch gesture) on a clip in the preview to zoom in/out and adjust framing. This can simulate a close-up or crop out unwanted edges.
TikTok's multi-clip editor lets you combine up to 35 video segments in one post, so feel free to stitch together multiple shots or scenes. When working with multiple clips, consider how posting frequency affects your performance as you build your content library.
How to Adjust Video Speed for Maximum Impact
Want slow-motion or a speed ramp? TikTok lets you change clip speed. Select a video clip, tap "Speed", and choose a preset or use the "Curve" tool for variable speed.
You might slow down a clip for dramatic effect or speed up a boring part. Use speed changes sparingly though. Often, creators use slow-motion on a key moment (like a reaction or a cool action) to emphasize it.
How to Add Music and Sound Effects to TikTok Videos
Audio is massive on TikTok. Around 85% of TikTok videos include music or sound. A great soundtrack can make your video far more engaging. Here's how to add sound:
Tap the "Sound" button at the bottom. From here you can tap "Add sound" to browse TikTok's vast library of music and viral sounds. You can search for a specific song or use recommended tracks (TikTok often suggests trending audio).
If your clip already has a sound but you want to change it, tap "Replace" under Sound and choose a new track. TikTok will replace the audio while keeping your clip timing the same.
Sound effects: TikTok also offers fun sound effects (like boings, whooshes, etc.). In the Sound menu, select "Sound effect", preview the options, and tap "Use" to drop it onto your video. You might add a ding at a comedic moment, for example.
Voiceover: Want to narrate or add commentary? Tap "Voiceover" in the Sound menu. Position the playhead where you want to start talking, then press the record button to capture your voice over the video. This is great for how-to videos or storytime clips where you explain something. After recording, you can adjust the volume so your voice and background music balance well.
Pro tip: Using a popular song or sound can boost your video's findability if it's trending. Just make sure the audio fits your content and that you sync key moments to the music beat if appropriate (viewers love satisfying sync). You can drag the audio waveform or adjust "Volume" settings to fine-tune how the music lines up with your footage.
For tips on creating engaging content, check out our TikTok beginner guide.
How to Add Text and Captions for Better Engagement
Text overlays can significantly increase engagement and accessibility. Many viewers watch with sound off, so having captions or titles ensures your message gets across. To add text:
Tap "Text" at the bottom of the editor. Type your text, choose a font, color, and style. TikTok offers various font styles and the option to add background highlights to make text pop.
Position and size the text by dragging it on the screen. You can place it anywhere over the video. For example, put a bold title at the top as a hook (e.g. "3 Tips for Perfect Coffee").
Set the duration of the text so it appears and disappears at the right times. After adding text, tap the text in the timeline (below the video) and drag the handles to adjust how long it stays on screen. This way, you can have different captions appear at different moments (like labeling a step while you demonstrate it).
For editing existing text: just tap the text on the preview and select "Edit" to change the wording or style. You can also duplicate text if you want to reuse the style.
Use text to emphasize crucial points or add context/jokes. Keep it concise and readable. Large, clear fonts in high contrast are best. Avoid long paragraphs of text; viewers won't read much on a fast-moving TikTok.
How to Apply Filters and Visual Effects
TikTok has a variety of visual effects and filters you can add during or after recording. In the editing stage, you can still apply some finishing touches:
Tap "Effects" (if available in the editing screen) to see options like time effects (replay, slow-mo) or stickers. TikTok's "Video effects" can be applied here on specific segments (e.g. a flash, shake, or zoom at a moment). You simply select a spot on the timeline and choose an effect to overlay.
Use Filters (usually accessible at top-right or bottom filters button) to change the overall color tone of your video. For example, make it warmer, cooler, black-and-white, etc. Filters can set a mood or make your clips look consistent if they came from different sources. Don't go overboard (pick one that enhances your footage).
Pro tip: Many creators use TikTok's "Storytime" filter or similar for a slight color boost.
Try TikTok's Magic effects or AI effects for fun: The "Magic" tool can automatically apply a bundle of effects/filters for a chosen style. It's like one-tap editing themes. Feel free to experiment and see if any fit your video. Also, TikTok's new AI Creative effects (under "AI Create") can generate visuals based on prompts, but that's more advanced and availability is limited.
Effects should serve the story or entertainment value. Flashy transitions, funny AR effects, and cool slow-motion are great if they make the video more engaging. If they distract or feel random, it might be better to keep it simple. Consistency can also help (using a similar filter or color tone on all your videos builds a recognizable aesthetic).
How to Add Transitions Between Clips
If you combined multiple clips, TikTok allows you to add transitions at the cut points. Tap the small "Transition" icon between two clips on the timeline (a white square), then preview and select a transition style. Examples include fades, slides, flashes, etc. This can smooth out jump cuts or create a cool effect (like a spin or zoom between scenes).
Keep in mind: you can only set a transition where two clips meet (it won't apply if there's just one continuous clip), and the transition duration may depend on clip length. A well-placed transition can make your video feel more polished and intentional. If transitions don't fit the vibe, jump cuts (no transition) are perfectly fine. They often actually make videos snappier which is good for TikTok pace.
How to Use Overlays and Picture-in-Picture Effects
A newer feature in TikTok's editor is overlay tracks (multi-track editing). This lets you add an overlay video or image on top of your main video (useful for reactions, cutaways, or dual-screen effects). To use it, tap "Overlay" and choose a secondary video or photo from your device. It will appear as a small picture-in-picture that you can resize and move.
You can have up to 8 overlays in a single video. For example, you might overlay a meme image or a screenshot while you're talking, or show your face in a corner reacting to a clip (if you didn't use the built-in Duet feature). This multi-layer capability brings TikTok editing closer to professional video editors, allowing some creative layouts (like split screens, etc.).
Use it to enrich your content: if you're explaining something, overlay supporting visuals.
How to Preview and Balance Audio Levels
Take a moment to preview your entire video. Play it back in the editor to ensure the timing of cuts, text, and effects feels right. Make adjustments as needed (trimming a bit more here, aligning text there, etc.).
Also double-check audio levels: TikTok provides volume controls for original audio vs. added sound (you'll usually see a "Volume" option when a sound is added). Balance them so your voice or important sounds aren't drowned out by music.
What to Do Before Publishing Your TikTok
Satisfied with the edit? Tap "Next" to proceed to the posting screen. Here's what to do before you publish:
Select a cover frame: Tap "Select cover" and choose a thumbnail image for your video. You can scrub through the video to find a compelling frame, and even add text/stickers to it. The cover is what people see on your profile grid and on the Discover page, so pick something eye-catching and representative. Choose a cover that encapsulates the video's appeal (e.g. if it's a cooking video, a shot of the finished dish).
Write a caption: Keep it brief but engaging. You might pose a question, add context, or include a call-to-action ("wait till the end!" or "tag a friend who needs this"). Also add hashtags that are relevant, especially any trending ones that fit. Captions and hashtags help with TikTok's SEO and algorithm in 2026, effectively acting as search optimization. Use keywords that match your content ("#DIYtips", "#MakeupHacks", etc.). But don't overload; 2-4 relevant hashtags are usually enough.
Tag others or add location if applicable (collab video, or a location-specific post). For most, this isn't needed, but if you worked with another creator you can @ mention them.
Ensure settings (who can view, allow Duet/Stitch, etc.) are as you want. Enabling Duets/Stitches can increase reach, as others might remix your video.
Post or save draft: If everything looks good, hit "Post" to publish immediately. Alternatively, you can Save as Draft if you want to post at a later optimal time. Drafts are also handy if you want a colleague or friend to review the video first or if you're prepping multiple videos to post on a schedule.
Critical reminder: Once you post a TikTok, you cannot edit the video itself or the caption. If you spot a typo or mistake, the only solution is to delete and re-upload the video with corrections. So take a moment in the draft stage to triple-check everything (spelling of text overlays, caption hashtags, etc.).
Best External Apps for Editing TikTok Videos
While TikTok's app is powerful, you might hit some limitations or simply prefer a different workflow. External video editing apps can offer more advanced features (from multi-layer timelines to precise control over each frame). Many TikTok creators edit outside the app for complex projects or to repurpose content from other platforms.

Why CapCut Is the Best TikTok Editor
If you've spent time on TikTok, you've likely heard of CapCut. It's a free video editing app by ByteDance (TikTok's parent company) geared toward creating short-form videos. CapCut is arguably the most popular external editor for TikTok, boasting over 300 million active users as of 2024.
Why so popular? CapCut offers a full suite of editing features on mobile and desktop: multi-track timeline, tons of effects and filters, text templates, green screen, auto-captions, you name it. It even has one-tap trending templates (you can drop your clips into a viral meme format or transition effect easily). Many TikTok trends explicitly use CapCut templates (ever seen "Edited with CapCut" on a TikTok?).
What makes CapCut stand out:
| Feature | Benefit |
|---|---|
| Advanced editing tools | Multi-layer videos, images, and audio tracks for complex layouts |
| Massive effects library | Dozens of transitions, filters, and AI-powered tools (auto-cutting, auto captions, motion tracking) |
| Music and sounds | Built-in library plus option to import your own |
| Direct TikTok integration | Export and post straight to TikTok without leaving the app |
| Cross-platform | Available on mobile (iOS/Android) and PC/Mac |
| Free | Core features free with no watermark on exports |
How to use CapCut for TikTok: Import your video clips into CapCut, arrange them on the timeline, and edit as desired (trim, add music, text, etc.). Make sure to set your canvas or aspect ratio to 9:16 (CapCut will prompt this if your video is vertical; it also has preset canvas sizes for TikTok). After editing, export in 1080p. Then upload to TikTok (either via the direct share or by saving to your camera roll and uploading manually). CapCut even automatically adds the correct video settings (format, dimensions) for TikTok, so you don't have to worry about technical specs.
Pro tip: Use CapCut's features to do things like subtitles with cool styles, remove silences, or multi-camera sequences. For example, if you filmed a reaction of yourself watching something, CapCut can overlay the two videos (you and the content) with precise timing, which you can't do inside TikTok easily. Also, CapCut's auto-caption feature is fantastic (it transcribes your speech to text on screen in one tap, with customizable styles), saving time on manually typing captions.
Other Mobile Video Editing Apps for TikTok
Aside from CapCut, there are plenty of smartphone editors you can use for TikTok videos:
| App | Key Features | Best For |
|---|---|---|
| InShot | User-friendly, music/stickers/filters, aspect ratio control | Quick edits with no watermark (small fee) |
| VN Video Editor | Multi-layer timeline, free | Advanced control similar to CapCut |
| Adobe Premiere Rush | Adobe's mobile editor | More advanced control on phones |
| Splice | Professional features | Precision editing on mobile |
The choice often comes down to interface preference and specific features. The good news: almost all these apps support 9:16 video editing and exporting to MP4, so they're TikTok-compatible. Use whichever you find comfortable, edit your video, export it, and then open TikTok and upload the finished file.
One thing external apps allow is reusing content across platforms. You can edit a video once and post it to TikTok, Instagram Reels, and YouTube Shorts. Just be cautious about removing any watermarks (for instance, TikTok adds a watermark if you download a posted video; Instagram's algorithm frowns on videos with a TikTok watermark). By editing in a separate app and saving a clean file, you avoid that issue. If you're managing content across multiple platforms, Shortimize's social media monitoring can help you track performance everywhere.
How to Edit TikTok Videos on Desktop (PC/Mac)
If you're comfortable on a computer or need ultra-precision, you can certainly edit TikTok videos on PC/Mac using professional software like Adobe Premiere Pro, DaVinci Resolve, or Final Cut Pro. These give you maximum control (you can do cinematic color grading, advanced motion graphics, layering dozens of clips, etc.).
For example, a complex split-screen challenge or a music video-style edit might benefit from desktop editing. Just remember to set your project resolution to 1080×1920 (or a vertical preset). Export settings typically use H.264 codec MP4, 1080×1920, 30 or 60 fps, and a reasonable bitrate (~10-15 Mbps is fine).
Editing on desktop is typically used by more advanced creators or brands who want top-notch production (or if repurposing existing footage shot in high quality). If you go this route, after exporting, you'll need to transfer the video to your phone (AirDrop, Google Drive, etc.) to upload via the TikTok app, or use TikTok's web upload on desktop. Keep file size in check (under a few hundred MB) to ensure smooth uploading.
AI Video Editing Tools for TikTok
A cutting-edge category in 2026 is AI editing tools that can automatically create short videos from longer content. These are especially useful if you have a YouTube video, podcast, or webinar that you want to turn into TikTok clips. Various AI video tools can detect key moments and format them into 9:16 clips with captions.
For creators looking to use AI for content creation, Shortimize maintains a comprehensive directory of AI video tools covering many of these options. You can also explore tools for creating faceless content or tracking faceless TikTok accounts if that's your content strategy.
Other AI tools can help with specific tasks: Descript can edit video by editing the transcript (great for cutting out filler words or silences), and many apps now include AI-powered auto captions that add subtitles with styling instantly. The AI route is optional but can be a time-saver if you're dealing with lots of content or want to speed up editing.
What to Know When Using External Editors
Keep these in mind:
Multi-layer and advanced effects: External apps allow things TikTok's editor doesn't (e.g., keyframe animations, gradually moving an object or zooming, bespoke transitions, masked overlays, etc.). Use these to stand out. For instance, you could animate text to dance with the beat, or do a clone effect with multiple copies of yourself. Creativity is the limit when you have powerful software. Apps like Premiere Pro or CapCut enable complex formats like split-screen dual videos with synced timing that would be hard to do in TikTok alone.
Export quality: Ensure you export in vertical orientation and good quality. Most mobile apps have a preset for TikTok or at least let you choose 1080p 9:16. On desktop, double-check settings to avoid black bars or wrong orientation.
Avoiding compression: TikTok will compress videos on upload, but starting with a high-quality file (1080p, decent bitrate) helps preserve clarity. Conversely, don't upload a 4K video (it's overkill and might get compressed more). 1080p is perfect for TikTok.
Sound sync: If you plan to use a trending TikTok sound, some creators will edit the video in an external app without music, and then after uploading to TikTok, they add the official sound and adjust the video's sound timing to sync. This way you get the benefit of the trend (TikTok's algorithm recognizes popular sounds) while still doing a custom edit. It's a bit tricky but doable: you mute your original backing track and line up the TikTok sound by ear. Alternatively, if the music isn't a trend, you can just include it in your edit file as normal.
Practice makes perfect: External editors have a learning curve. Start with simple projects and build up. There are plenty of tutorials on YouTube for "Editing TikTok in [app name]" (e.g., "CapCut tutorial for TikTok" or "Premiere Pro vertical video tutorial"). Investing time to learn can seriously elevate your TikTok content quality.
In summary: choose the editing workflow that suits your needs. For many quick posts, TikTok's in-app editor is fastest. For more elaborate videos, external apps like CapCut or InShot offer greater flexibility. Some creators even combine approaches (e.g., using CapCut to do heavy edits, then using TikTok's editor to add a final viral sound or effect). The goal is to create a video that's polished and optimized for TikTok's platform.
TikTok Editing Best Practices That Actually Work
Now that you know the how of editing, we'll talk about what makes an edited TikTok successful. The technical cuts and effects are one thing; using them strategically to engage viewers is another. TikTok is a unique beast (rapid-fire content and an algorithm that heavily rewards watch time and engagement). Here are the top editing best practices to maximize your video's impact:
The foundation of TikTok success? Hooks, pacing, and strategic editing that keeps viewers watching.
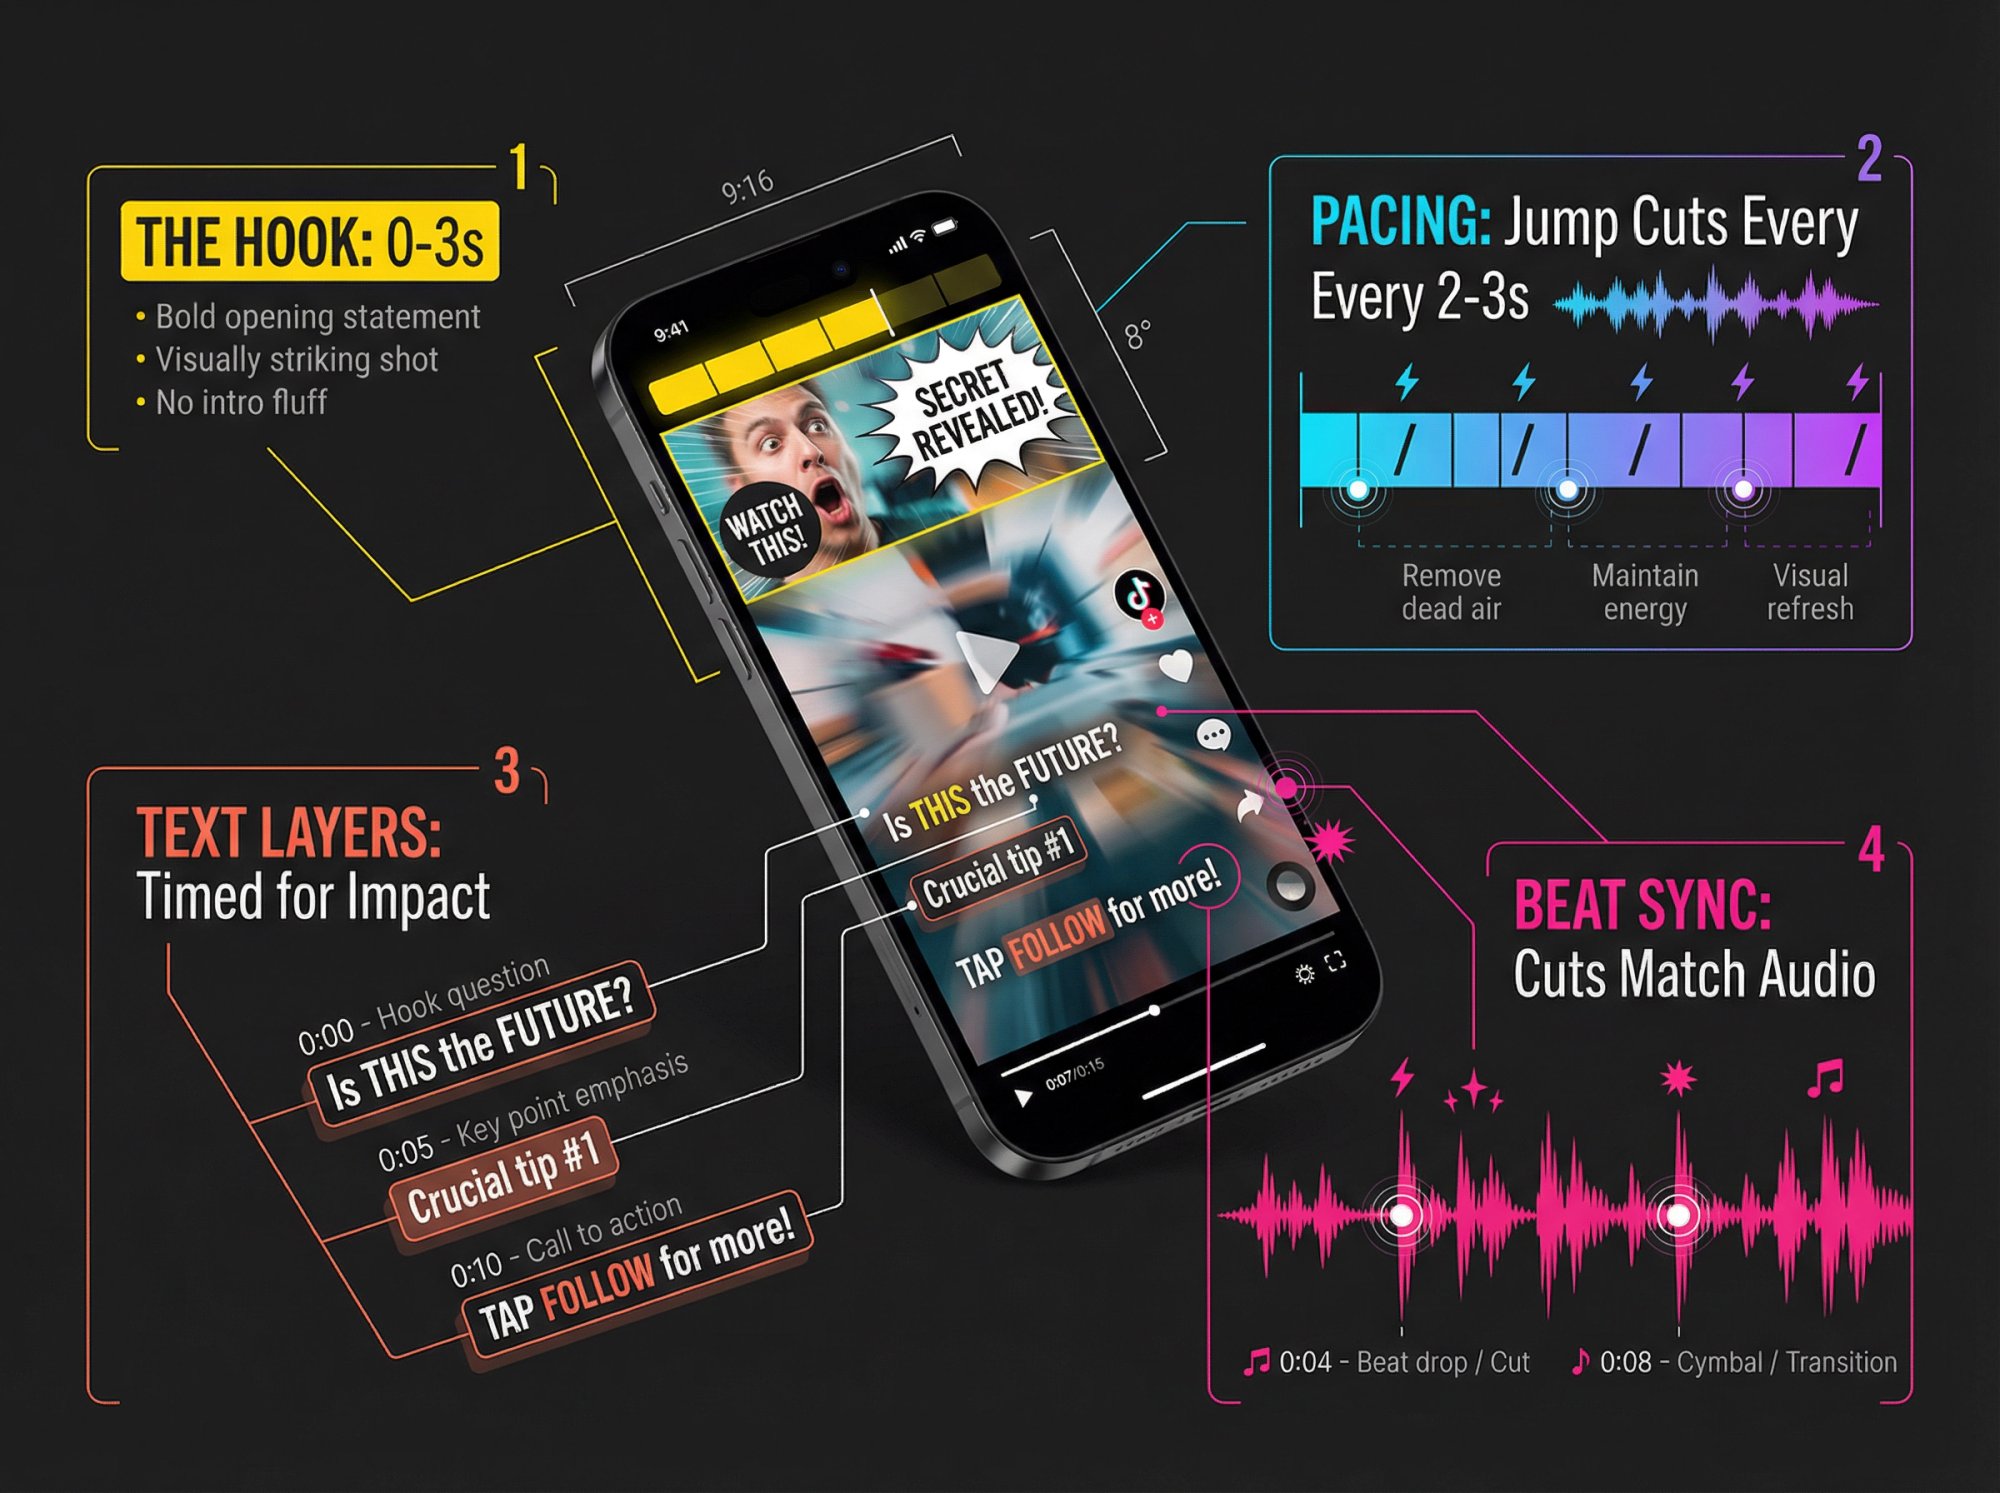
How to Hook Viewers in the First 3 Seconds
TikTok's feed is ultra-competitive for attention. You literally have a second or two to convince someone not to scroll past. A strong hook at the very start of your video is essential. When editing, front-load your most interesting content.
The Hook Strategy: Don't save your best moment for the end. Lead with intrigue, then deliver context. Your first three seconds determine whether viewers stay or scroll.
For example:
① Begin with an intriguing question or statement in text or audio. If your video is a recipe, don't start with "Hi, today I'm going to make…" Instead, start with "This 10-minute pasta changed my life." Bold claim that makes people curious.
② Use a visually striking shot as your opener. If there's a money shot later, consider cutting it to the front (you can reveal context after). E.g., show the final dish or a crazy before/after result at the start in a quick flash.
③ Fast-forward any intro fluff. If you filmed a longer clip, edit out any pauses, "um"s, walking on camera, etc., at the very beginning. Jump straight into action.
One technique is the "open loop": hint at something interesting to be revealed. For instance, text on screen: "Watch till the end to see the surprise…" or show a quick teaser clip of the end result right at the beginning.
In editing, sometimes I'll cut the first half of a clip entirely if it's slow, and start at a more exciting midpoint. As a rule of thumb, make sure by the 1-second mark, your video has posed a question, shown an enticing visual, or otherwise given the viewer a reason to keep watching. This directly boosts watch time, which TikTok's algorithm notices and rewards.
How to Keep Up a Quick Pace (Remove Boring Parts)
TikTok viewers have short attention spans. Pacing is everything. Through editing, aim to remove any lull or dead spot in your video. Some tips:
Use jump cuts to eliminate silence or waiting. If you're talking and have a pause or stumble, cut it out so your speech is tight and continuous. Many TikTokers intentionally edit out the gaps between sentences (it can feel a bit fast, but it maintains energy).
Show, don't tell (or do both at once): If you have explanatory parts, overlay B-roll or text so there's always something happening visually. For example, during a voiceover story, cut to relevant footage or images instead of one static shot.
Split longer scenes: If one clip runs more than a few seconds on the same framing, consider cutting to a different angle or inserting a quick zoom effect to reset viewer attention. TikTok allows up to 10 minutes, but rarely does a single uncut scene hold attention unless it's extremely captivating. By editing multiple angles or cutaways, you refresh the visual stimulus.
Use transitions or on-screen movement: As mentioned, adding transitions can maintain flow between clips. Even within one clip, you can introduce movement via zooms or pans (CapCut and others let you animate these). The idea is to avoid static feeling. Understanding optimal video length for different platforms can help you determine the right pacing for your content.
Still, quick pace doesn't mean chaos. Be careful not to make it so fast that it's incoherent. There's a balance: no moment should drag, but the story should still make sense. A good practice is to watch your edit back and note if there's any point you yourself feel like checking the time. If yes, that part might need trimming.
How to Use Text Captions to Boost Engagement
We touched on adding text for accessibility, but it's also an engagement strategy. Many viral TikToks feature annotated commentary or subtitles that add personality. How to use text in your edits:
Subtitles for speech: If your video has talking or voiceover, adding captions (either manually or auto-generated) is strongly recommended. Not only do captions make it watchable without sound, they also reinforce key phrases visually. Use a clear, large font (TikTok's default Classic or Typewriter fonts work, or stylish ones in external apps) and consider adding a subtle highlight or drop-shadow for readability.
Emphasize important words: Some editors make certain words larger or different color to emphasize them. For example: "This hack literally saved me hours." Emphasize "literally" with a different style. This kind of dynamic text editing (easy in CapCut/Premiere, doable in TikTok by splitting one caption into multiple timed parts) adds visual interest.
Use text to drive narrative: You can actually tell a story with on-screen text even if you never speak. E.g., doing a montage of clips with overlay text like "Step 1: Do X… Step 2: Do Y". This works well for faceless content or photo slideshows. In fact, an entire TikTok genre is storytime with text on screen over videos. People will watch the visuals and read the story in captions. It's engaging because it forces them to pay attention to catch the next line of text.
Stickers and emojis: TikTok has stickers/gifs you can add (in the Effects or stickers section). A well-placed animated sticker (like an arrow pointing to something, or a funny sticker reacting) can add humor or direct focus. Don't overload your video with stickers, but one or two can complement your edits.
Make sure any text stays on screen long enough to be read fully, especially if it's important. A common mistake is flashing a sentence too quickly. A good rule: read the text aloud yourself and ensure you give viewers at least that much time, plus a second buffer.
How to Sync Edits to Music Beats
TikTok is inherently an audio-visual platform. Syncing your edits to the music beat can make a video immensely satisfying. Here's how to make sound work for you:
Match cuts to beats: If you use a music track, try to cut your clips or transition exactly on the beat drops or changes in the song. For example, in a glow-up montage, every beat in the song could jump to the next photo. Viewers subconsciously love when the video aligns with audio. In editing apps like CapCut or Premiere, you can see the audio waveform and place cuts accordingly. On TikTok, you might have to do a bit by feel (or use the "Auto sync" feature if you added multiple photos/clips with a sound; it will attempt to align them to beats).
Dramatic silence: Conversely, sometimes muting the audio at a certain moment can create comedic or dramatic effect. For instance, you set up a joke and then cut the music right when delivering a punchline phrase. The sudden silence focuses attention on that moment (and often makes it funnier). This is advanced timing but can set your video apart.
Use trending sounds strategically: If a particular sound bite or meme audio is trending and suits your video, you might edit your video to complement that sound. Example: there was a trending sound "Oh no, oh no…" that people used to show fails. If you wanted to use it, you'd edit a scenario where something goes wrong right as the "oh no" plays. Keep an eye on TikTok trends and think how editing can ride that wave. Sometimes the absence of editing (like using a raw clip but with the perfect sound) is what trends, so gauge accordingly.
Add sound effects for emphasis: Tiny sound effects can accentuate your cuts. A "whoosh" sound on a transition can make it feel smoother. A "pop" sound when text appears can draw the ear. TikTok's editor has some sound effects, as do external libraries. For a comedic effect, adding a record scratch when something unexpected happens, or a dramatic boom on a zoom-in to a surprised face can amplify the humor. These are editing choices that turn an okay video into a great one by reinforcing the mood.
Always double-check the audio mix. Voices should be clearly audible over background music. TikTok allows you to adjust "Original Sound" vs "Added Sound" volume. Use that tool so one doesn't overpower the other. If using external editors, you'll control volume tracks there.
How to Use Filters for Consistent Visual Style
Using a consistent filter or color style on your videos can establish a signature look and also make your video look more polished. TikTok's built-in filters (e.g., "Vibe", "Food", "Portrait" categories) are quick fixes. External editing gives even more control via color grading. Some pointers:
Choose a filter that suits the content: For a warm, friendly vibe, a slight warm-toned filter works. For dramatic or techy videos, cooler or high-contrast looks work. Filters can also enhance specific content (e.g., a food video might pop more with a vibrant filter that saturates colors).
Don't overdo beauty filters: TikTok has beautify effects; use sparingly if at all, as too much can be distracting or inauthentic.
Consistency across videos: If you're building a personal or brand channel, using the same or similar filter in every video can subconsciously create brand cohesion. Viewers recognize your style. E.g., maybe you always use filter S3 with intensity 70. Go for it if it matches your aesthetic. On the flip side, don't be afraid to go without a filter if the raw footage looks great. Not every TikTok needs heavy filtering (sometimes #nofilter feels more real).
Lighting fixes: In your edit, if a clip is too dark, bump up the brightness a bit in a third-party app or TikTok's adjust tool. Avoid having one scene super dark and the next very bright. Try to balance them so the viewer's eyes don't strain. TikTok's "Adjust clips" section also has basic brightness/contrast controls. An even look across the video prevents jarring transitions in exposure.
The key is to make your video look good on a small phone screen. High contrast, clear subject, and decent brightness help. Tiny details (like subtle color grading differences) matter less than overall clarity and pop on a phone display. So focus on making sure your edits yield a clear, easy-to-see result (watch on your phone before posting to check).
How TikTok's Algorithm Rewards Good Editing
It's worth noting that your editing choices can significantly affect how the TikTok algorithm treats your video. TikTok's algorithm highly values completion rate (do people watch your video to the end) and re-watches. Good editing can boost both:
Algorithm insight: Every editing decision you make sends a signal to TikTok. Tight pacing, strategic hooks, and satisfying payoffs don't just make good content – they make content the algorithm rewards with more reach.
If you follow the tips above (strong hook, tight pacing, etc.), more people will watch through. When TikTok sees that, it shows your video to more users. Understanding what constitutes a good engagement rate and view rate can help you set benchmarks for success.
Some creators intentionally create looping videos (where the end of the video flows seamlessly to the beginning, causing viewers to accidentally watch it multiple times). This is a clever editing trick: for instance, your last clip might cut perfectly into the first clip. Viewers might not even realize it looped and continue watching. A seamless loop often leads to higher total watch time as people might sit through twice. Consider if a loop format makes sense for your content and if so, edit carefully to blend end-to-start (it could be as simple as cutting the video in the middle of an action and placing the beginning such that it resolves that action).
Including a "wait for it" moment or a payoff at the end encourages people to watch fully. Editing-wise, you might tease the payoff early (as mentioned in hooks) or use captions like "…you won't believe the ending" to hint there's a reason to stay. Just be sure to deliver on the hype! Nothing annoys TikTok viewers more than "bait" that doesn't pay off.
Also, shorter videos often loop naturally. A 15-second funny skit might replay before the person swipes, giving you a potential double view. But don't sacrifice content just to be short. Meaningful content that's a minute can outperform a pointless 15s clip. The goal is optimized length: as long as needed to be great, and not a second longer.
How to Use TikTok Editing Trends Effectively
TikTok trends evolve quickly. As an editor, keep an eye on popular editing styles or challenges:
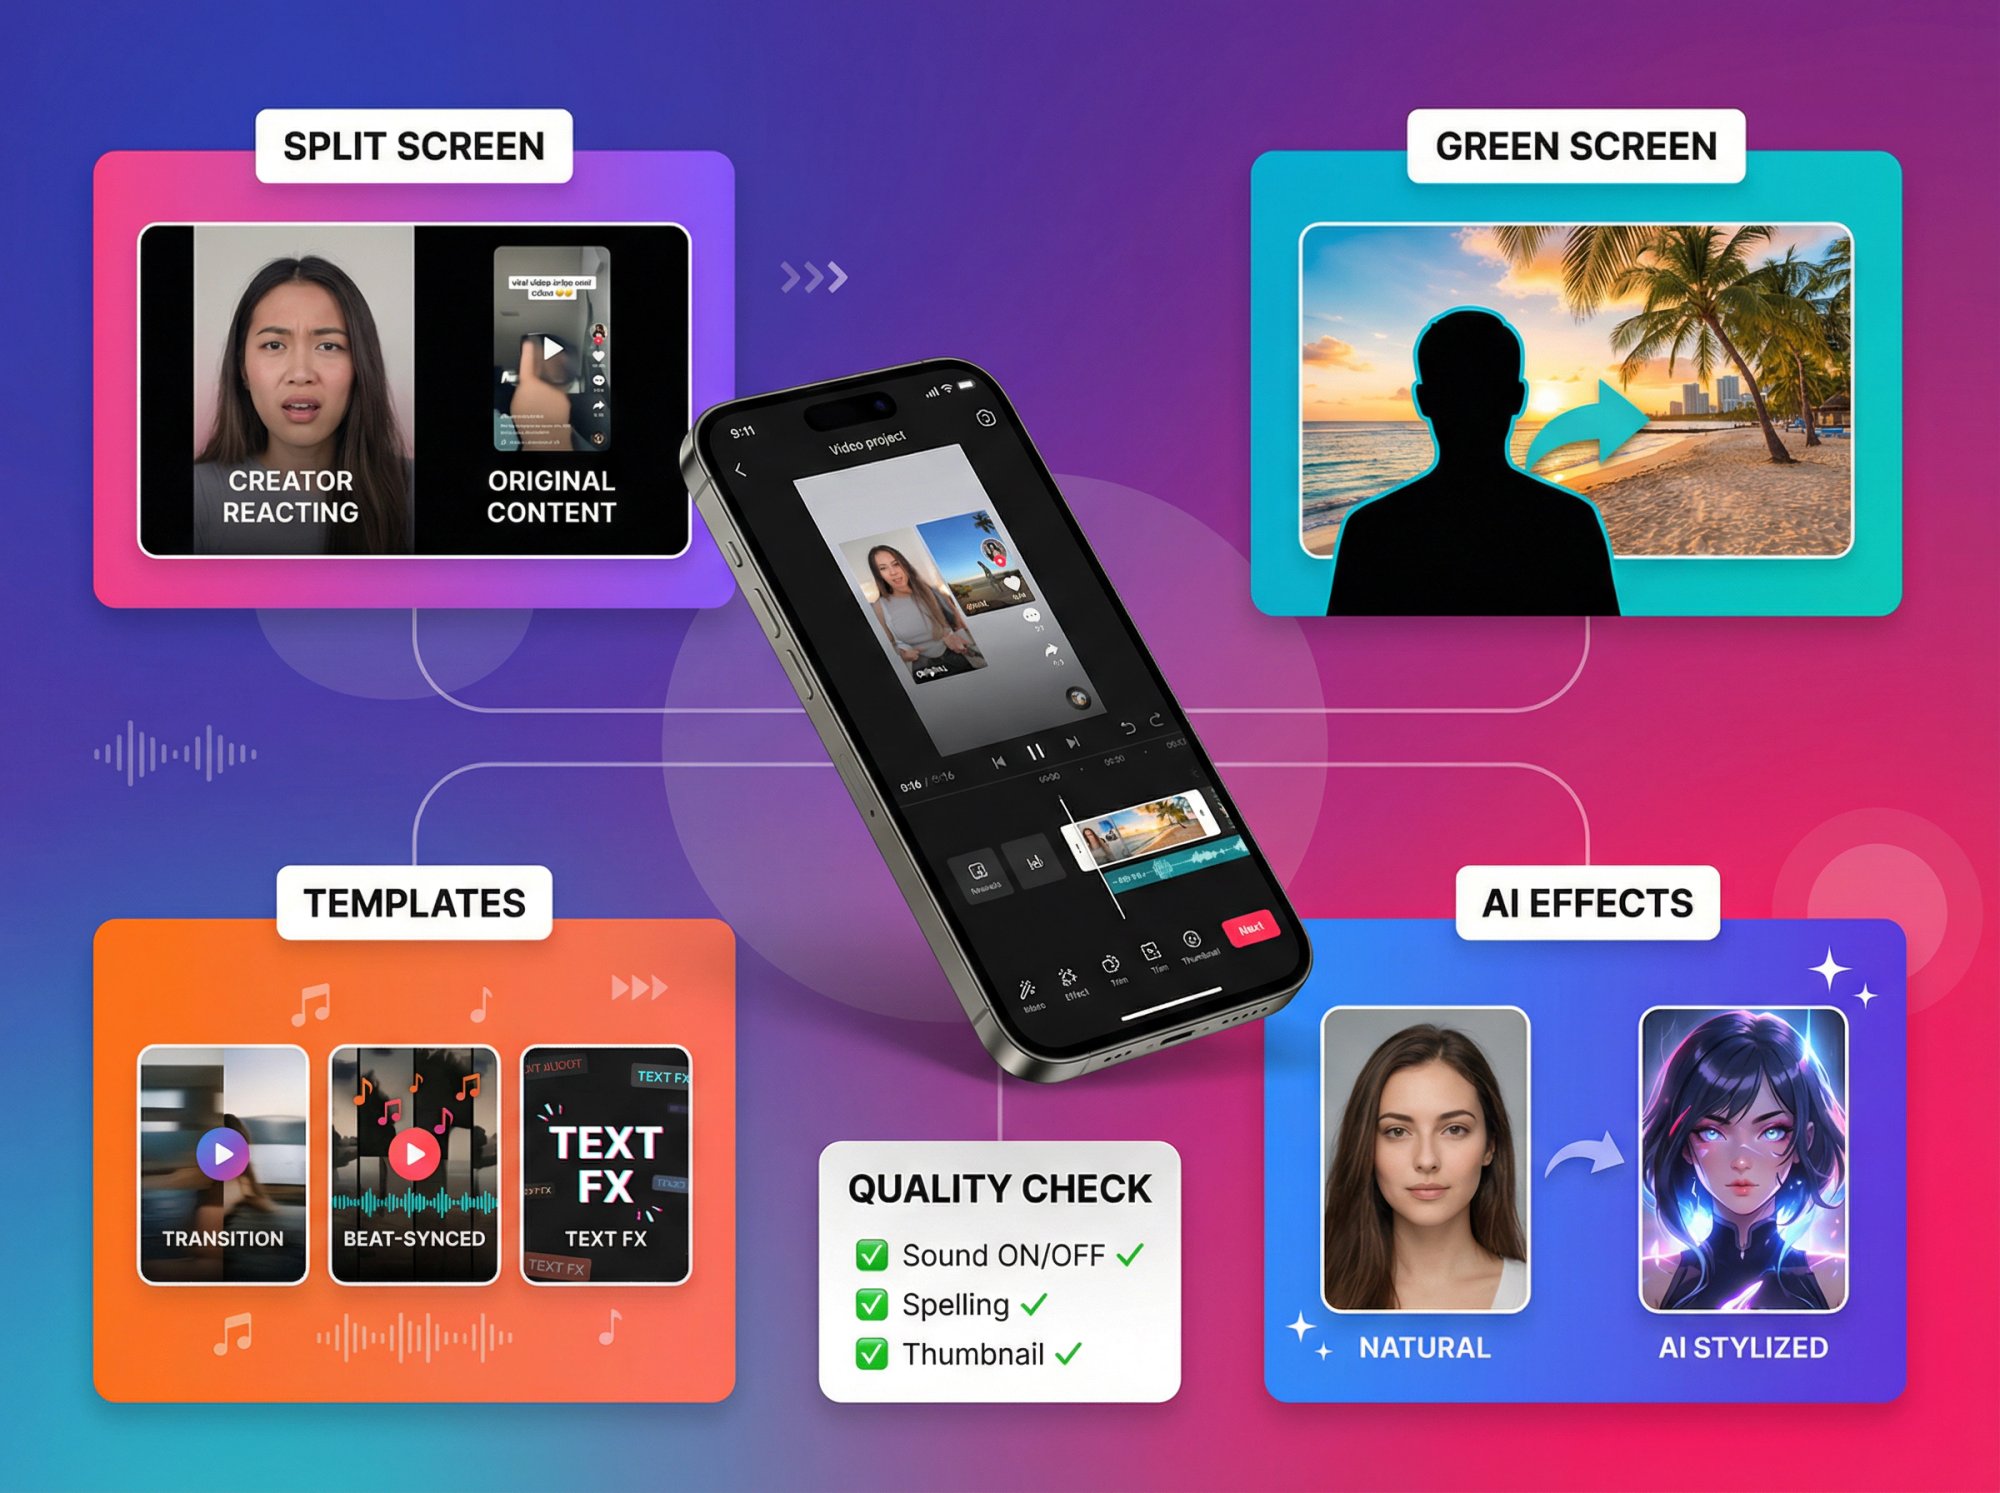
Split screen / dual video: In 2024 a trend was showing two videos side by side (like two perspectives). This requires an editing tool that can layer videos. If a trend like that arises, you now know external apps can do it (CapCut, Premiere, etc.).
Green screen effect: TikTok has a built-in Green Screen filter that lets you appear over an image or video background. While not exactly "editing" in post, it's a tool you apply during creation. Many educational or commentary TikToks use this to show something in the background while the creator talks. If it fits your video, you can record with green screen and then still use the editor for further tweaks.
Templates and presets: Both TikTok and CapCut offer templates where you just plug in clips and get a pre-made edit (with music, transitions timed, etc.). Using templates can be a fast way to join a trend. For example, TikTok might have a trending "photo slideshow to a specific song" template (you add your photos and it syncs them). CapCut's template section often corresponds to TikTok trends (CapCut trends sometimes even show a template ID in TikTok). Don't shy away from templates, especially if you're not super confident with manual editing. They can produce high-quality results with little effort. You can learn from them too, seeing how the cuts are made.
AI filters or effects: As TikTok rolls out new effects (like the AI Manga filter that was viral, or Morph transitions), consider how you can incorporate them creatively. Sometimes the effect itself is the trend (e.g., the Teenage Filter, Bold Glamour filter on TikTok sparked many reaction videos). If using one, your editing might revolve around it (e.g., show before and after, or cut reactions in). Be agile and willing to play with these in your editing plan.
Staying updated via TikTok's Discover page or following creator news will clue you into these trends. Then it's a matter of editing execution to ride the wave. Just ensure any trend aligns with your content niche or audience. Relevancy matters more than just copying a trend.
Quality Check Your Edit Before Posting
Before finalizing any TikTok video, do a quick quality audit:
Watch with sound on and off: Does it still make sense if muted (with your captions)? Does it sound good if listening (no weird audio cuts or too loud music)?
Check spelling/grammar: If you have text, double-check it. A typo in a caption can draw negative attention or reduce credibility. It happens to the best of us. A quick proofread can save embarrassment (and remember, you can't fix it after posting without redoing the post).
Get a second opinion: If possible, have a friend watch the draft. Fresh eyes might spot a confusing edit or suggest a quicker punchline. They might also tell you if any part was boring or too fast. This feedback is gold for improving your editing intuition.
Ensure branding (if needed): For business or personal branding, see that your video includes your brand elements appropriately (maybe a logo at the end, consistent colors, or a mention of your product if it's promotional). But keep it TikTok-native (overly polished ads can flop). Often, showing your product naturally in use is better than slapping a logo. Editing for branding is about subtle integration: e.g., if you always sign off with a certain slogan on text, include that.
Optimize thumbnail text (if used): As noted, TikTok allows text on the cover thumbnail. If you use that, make it enticing and not cut off (TikTok shows a center-cropped version in the feed sometimes). Something like "How I did X in 1 Day" could be a thumbnail text that attracts curiosity.
Performing these checks will ensure the video you post is the best version of your idea. Given how fast TikTok moves, it's tempting to just churn out content, but taking a bit of care in editing can be the difference between 100 views and 100k.
Key Takeaways: Edit Smart and Keep Experimenting
Editing is where the magic happens. It's the stage that can turn a mediocre clip into a viral TikTok. By mastering TikTok's in-app tools and knowing when to use external apps, you have a full toolkit to craft engaging short videos.
The truth about editing mastery: Great editing amplifies great content. Always start with a clear idea or value to deliver (be it a joke, a tip, a story) and use these editing techniques to deliver it in the most punchy way possible.
A few closing tips to keep in mind:
Continuously learn from others: Scroll your FYP not just for entertainment, but with a critical eye on editing. Notice what cuts, effects, and pacing top creators use. If a video hooked you, scrub back and analyze why (was it the snappy intro text? The suspenseful music?). Try to reverse-engineer and apply those lessons to your editing style. TikTok communities and subreddits often discuss editing tricks as well.
Don't be afraid to break the rules: While we've given guidelines (e.g., "fast pace, short length"), some TikToks succeed by doing the opposite (a 3-minute slow-burn story can captivate if done really well). Once you understand the conventions, you can bend them when appropriate. The key is to know your audience and content. If your target viewers will enjoy a longer explanatory video, do it, but you might edit in other ways to keep them (like adding lots of visual aids). Always be testing different formats and noting the response.
Maintain your authentic style: TikTok viewers appreciate authenticity. Use editing to enhance your personality, not to create a false one. For instance, if your style is goofy and unfiltered, overly slick MTV-style cuts might feel off (maybe a slightly rough, vlog-like editing fits better, leaving a tiny pause or a funny mistake in can sometimes charm viewers). Conversely, if you're showcasing skills (like cooking, makeup, dancing), tighter edits will highlight your professionalism. Adapt techniques to your voice.
Finally, once you've posted your beautifully edited video, track its performance and learn from the data. See the watch time stats, where did people drop off? That can tell you if your pacing/editing lost them at a point, which you can refine next time. And pay attention to comments. If multiple viewers comment "Wow, love the editing!" or conversely "This was too fast to follow," that's direct feedback.
Creating killer TikToks is an iterative process (concept, edit, measure, improve). With the strategies in this guide, you're well on your way to editing videos for TikTok like a pro. Now get out there and cut something awesome! And once your content is live, don't forget to monitor its performance. Tools like Shortimize can help you track your TikTok analytics across videos over time, so you can see which editing tweaks coincide with spikes in views or engagement.
You can also compare your performance across Instagram Reels and YouTube Shorts to understand what works on each platform. Happy editing, and may your TikToks find their way onto countless For You pages!
Leave a Reply